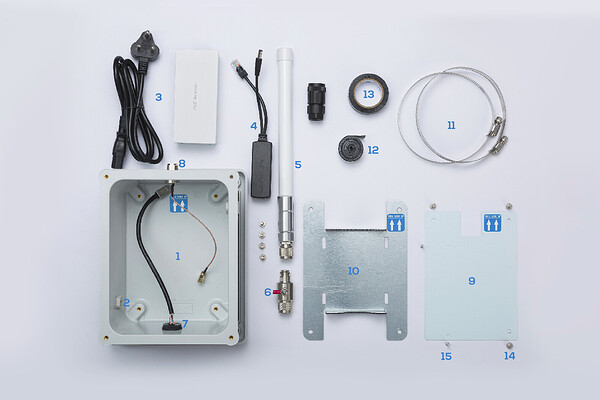
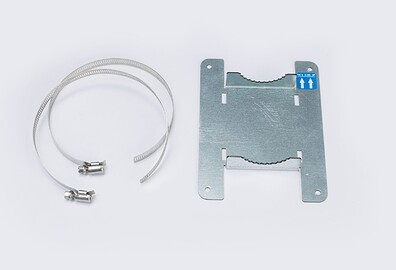
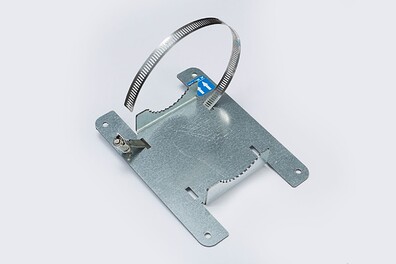
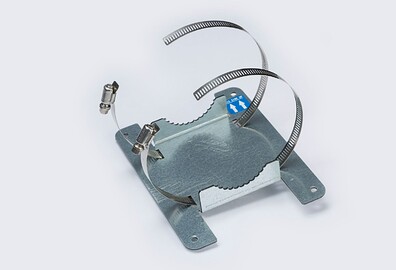
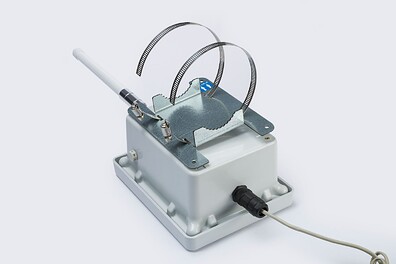
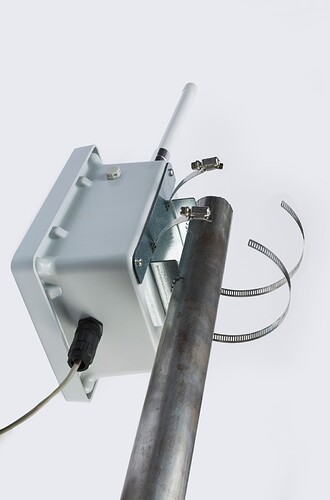
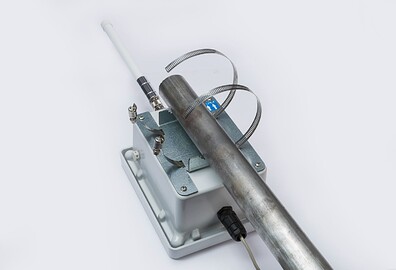
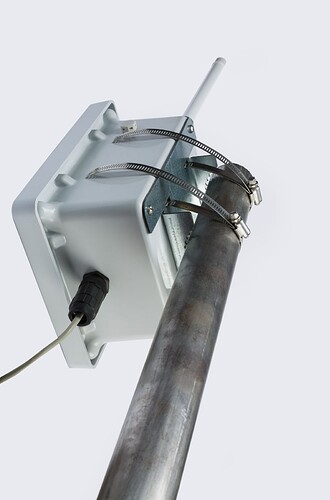
The Outdoor compatible accessories kit for Pro Hotspot (Indoor) opens up an abundance of opportunities, allowing the ability to mount the indoor hotspot off grid onto the side of buildings, houses and roofs - an ideal solution for wider coverage applications across villages, towns and cities.
Package Contents
ClodPi’s Outdoor accessories kit compatible for its Pro Hotspot (Indoor) device is provided comes with the following items:
| SN | ITEM | QUANTITY |
|---|---|---|
| 1 | Enclosure (IP67, fiberglass reinforced polyester material) | One |
| 2 | Breathers | Two |
| 3 | PoE Injector 802.3at (48V, industry grade) with power cord | One |
| 4 | PoE Splitter 802.3at | One |
| 5 | Antenna (3.5dbi, Fiberglass) | One |
| 6 | Surge Arrester | One |
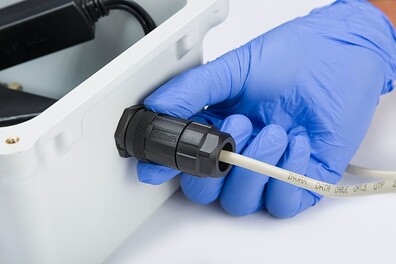
| 7 | RJ45 Connector (IP67) | One |
| 8 | SMA to N Connector | One |
| 9 | Base Plate (Mild Steel) – to mount Pro Hotspot (Indoor) inside the enclosure | One |
| 10 | Flagpole Mounting Kit - Metal Bracket | One |
| 11 | Flagpole Mounting Kit - Metal Hose Clamps | Two |
| 12 | Weatherproof Tape | One |
| 13 | Insulation Tape | One |
| 14 | Screws (M4) | Seven |
| 15 | Screws (M3) | Two |
Prerequisite:
You will need to purchase separately
-
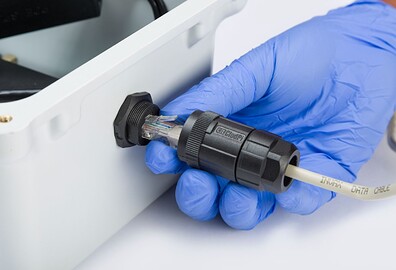
RJ45 Ethernet (cat5e or cat6) Shielded Twisted Pair (STP) cable only in order to connect your internet router with your Hotspot outdoor setup. The length of the cable will depend on the distance between your PoE Inject / internet router and the outdoor enclosure where it is being deployed (Terrace / roof / any other location).
Note: Follow T568B standard for crimping. Avoid T568A standard.
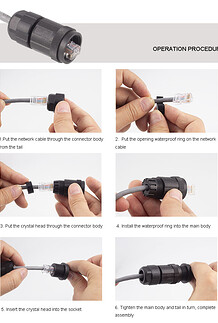
Please refer to the ‘Operation Procedure’ for connecting the RJ45 ethernet cable through the RJ45 connector.
-
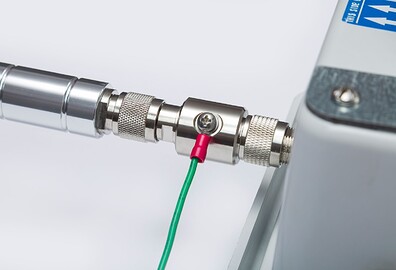
Earthing / Copper wire in order to connect surge-arrester with the earthing / grounding mechanism to protect the hotspot from a lightning strike.
-
Mounting Flagpole of non-rusting material having a diameter between 2 to 2.5 inches. The length of the flagpole is your choice to get a clear line of sight for your Hotspot.
-
Clamps and nails to securely install the mounting flagpole on your terrace, roof or any other identified location.
-
Identify a location on your terrace/roof and fix the Flagpole using Clamps and nails in such a way that the tip of the pole has no obstructions like concrete walls, brick walls, metal mesh, metal grills.
-
Screwdriver with ability to screw slotted and crosshead (Philips) screws.
Note: The images shown are for depiction purposes – actual color may slightly vary.
Safety Instructions:
Users are requested to strictly follow the important points mentioned below while setting up the Pro Hotspot (Indoor) device using an outdoor accessories kit:
-
IMPORTANT: Do not power on the hotspot without the LoRa antenna connected as this may damage the hotspot.
-
Even though the Outdoor enclosure box is designed to be used outdoors in all weather conditions, it is highly recommended to safeguard it from all the factors of harsh environments.
-
Do not try the setup in underwater/submerged mode or near to Fire.
-
All the connectors on the outdoor enclosure are already tightened to the maximum possible. But users are expected to test these before proceeding with outdoor installation as to avoid any possible water slippage. Keep checking the same intermittently.
-
The setup is expected to work under direct sunlight but if possible do provide some shade to the enclosure box.
-
In open to sky mode, there is always a risk of a lightning strike during the monsoon season which may damage the device. For protection from lightning, it is important to use surge resistor/protection between the outdoor enclosure box and the antenna to avoid any untoward damage to your hotspot device in the event of a lightning strike or similar incident.
-
Before proceeding with setting up the device inside the outdoor enclosure, it is expected to complete the Helium boarding process for the device. Please refer to our on-boarding guide here.
Start setting up Pro Hotspot (Indoor) using Outdoor kit:
-
Step 1: First complete the onboarding process for ClodPi’s Pro Hotspot (Indoor) as mentioned here.
-
Step 2: Be ready with the materials as mentioned in the “Prerequisite” section above.
-
Step 3: When the hotspot is completely onboarded to the Helium platform, remove the power, internet and indoor antenna from the device one by one.
-
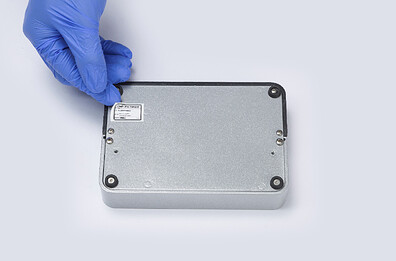
Step 4: Since the Hotspot device will be placed inside the outdoor enclosure, you need to remove the Device ID sticker that is present at the bottom of the device.
-
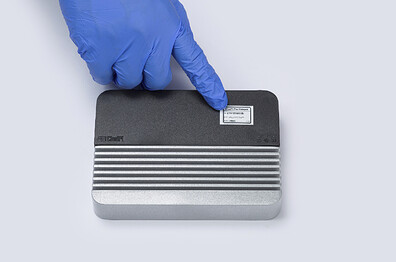
Step 5: Stick the sticker on the top of the device so that it is visible once the device is fitted inside the enclosure box.
-
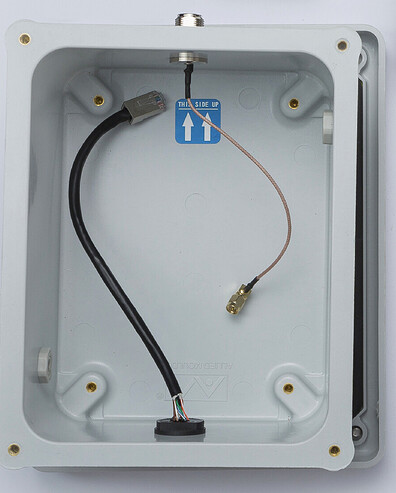
Step 6: Take the outdoor enclosure base and see that it has one antenna connector, one RJ45 connector, and two breathers already fitted in.
-
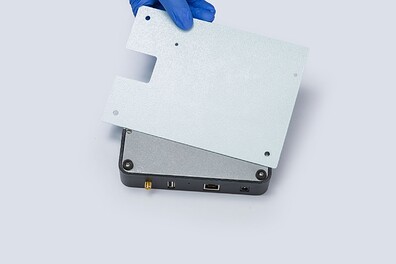
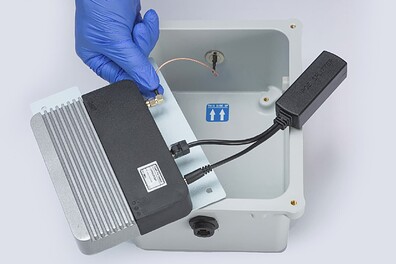
Step 7: Keep the Hotspot device upside down on a soft surface. Make sure the antenna jack, ethernet jack and power jack are facing towards your side. Observe that there are two holes at the base for the mounting option. Take the metal base plate and place it on the device so that the holes for screw are exactly on top of the mounting options provided on the base of the hotspot device.
-
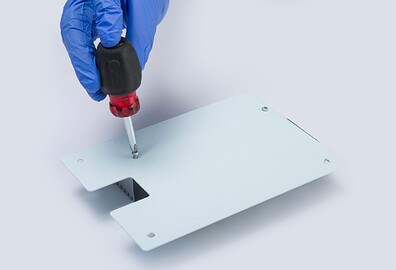
Step 8: Take the two M3 screws and screw them onto the base pale so that the base place and Hotspot device are fastened together. Turn over the device along with the base plate
-
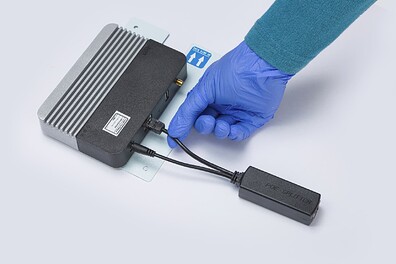
Step 9: Take the POE Splitter and hotspot along with the base plate setup. Connect the power and internet connectors of the splitter to the ethernet and power jack on the device.
-
Step 10: Place the base plate with Hotspot on top of the enclosure box. Take the antenna connector and properly screw its end to the antenna jack on the Hotspot as shown.
-
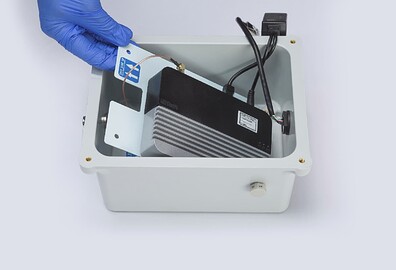
Step 11: Now place the base plate safely inside the outdoor enclosure making sure the antenna connector is not harmed. Make sure the holes at the corners of the base plate are properly aligned with the screw holes available at the bottom of the outdoor enclosure.
- Note: Be careful so that while tightening the screws they do not slip under the base plate.
-
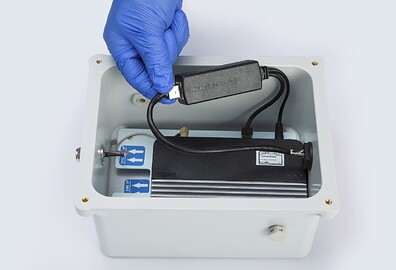
Step 12: Take the other end of the ethernet connector on the outdoor enclosure and connect it to the POE Splitter jack.
Note: Now you have the Hotspot placed inside the outdoor enclosure, antenna connector, POE Splitter connected to the hotspot.
-
Step 13: Take the three M4 screws and tighten the base plate to the enclosure box as shown in the figure.
-
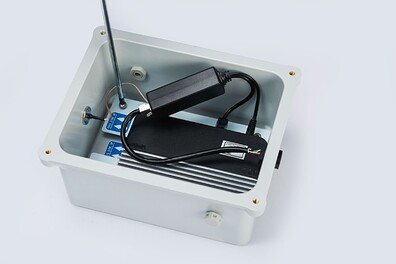
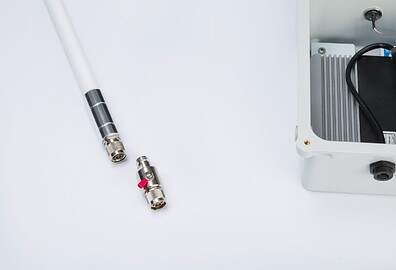
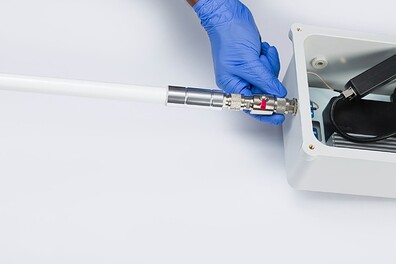
Step 14: Take the fiberglass antenna and surge arrester. Carefully screw in the surge arrester and the fiberglass. Tighten them properly to avoid any shaking or play w.r.t the surge arrestor and antenna.
-
Step 15: Now screw the surge arrester’ bottom onto the antenna connector available on the outdoor enclosure. Tighten them properly to avoid any shaking or play w.r.t the surge arrester and antenna connector available on the outdoor enclosure.
-
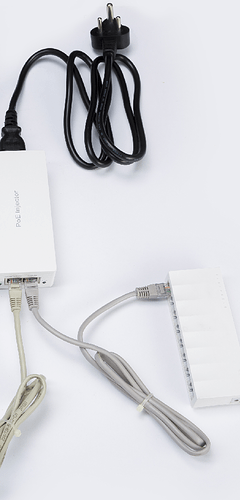
Step 16: To provide power to the hotspot, we will be using a Power over Ethernet Injector (PoE - IEEE 802.3at) provided along with the outdoor accessories kit.
-
Step 17: Setting up the POE Injector:
- Connect the POE Injector power cord (black) provided to the power main.
- Take an ethernet cable with crimps on both the sides and connect one end of it to the POE Injector and another end with your internet router.
- Connect one end of RJ45 cable (cat 5 or cat6) to PoE Injector.
Note: A minimum of 10 mbps download internet speed is needed.
-
Step 18: Now we need to take the other end of RJ45 Ethernet (cat5e or cat6) cable to the location where you have erected the flagpole.
Connect the other end of the RJ45 Ethernet (cat5e or cat6) cable to the RJ45 connector at the outdoor enclosure.
Note: Please refer to “Operations procedure” steps at the “Prerequisite” section to understand how to set-up the RJ45 connector over the RJ45 Ethernet cable. -
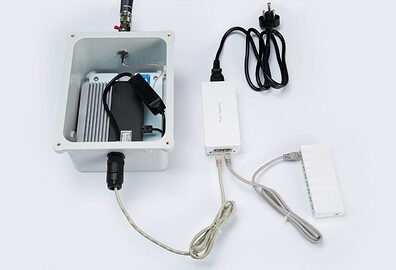
Step 19: Connect the power cord of the PoE Injector with the power main. Make sure the internet router is also ‘ON’. The complete setup should be like the adjacent image.
Note: This image is a depiction. In a real situation, the outdoor enclosure will be at the location where you want to mount it. PoE Injector and Internet Router will be near the power main. -
Step 20: Switch on the power for POE Injector. Observe the LEDs on hotspot. It takes a minute or so to power on.
Note: If a hotspot is powered using a wired Ethernet connection, the hotspot may take some time to be fully operational as it will check for firmware version and perform firmware updates as soon as it gets connected to the internet. Please wait for some time, usually 10 to 15 minutes, as your hotspot may be checking for the latest firmware version. -
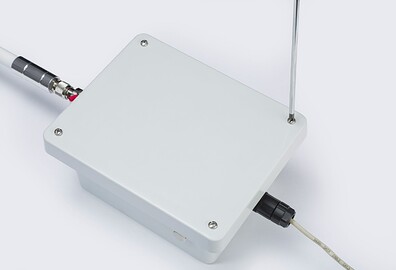
Step 21: Once all the LEDs on the hotspot are lit, we are sure that the outdoor connections are good. Now tighten the enclosure top cover using the screws on the enclosure bottom.
Note: Next step is to mount the outdoor enclosure onto the flagpole. For this we need to first switch-off the power main. -
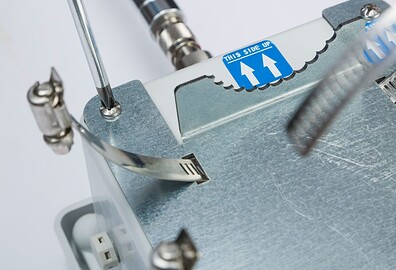
Step 22: Mounting the outdoor enclosure onto the flagpole using the bracket, clamps/metal tie, screws provided along with the outdoor accessories kit:
- Take the enclosure and keep upside down
- Remove the 4 screws from the base bottom
- Take the bracket
- Take both the metal hose clamps and open them up
- Insert both the metal hose clamps as shown into the hole provided in the bracket
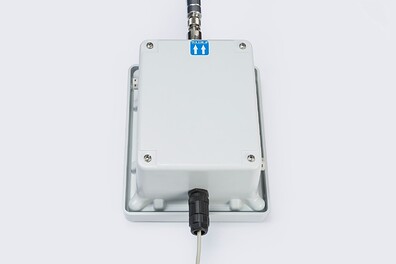
- Now place the bracket with metal hose clamp on to the back side of outdoor enclosure bottom
- Make sure to align the bracket on to the bottom as per the arrow marks (This side up) provided
- Using the four M4 screws, tighten the bracket on to the enclosure bottom on all the four corners
-
Step 23: Now our set up is ready to be mounted on the flagpole.
- Hold the Enclosure and keep the bracket teeth on to the side of the flagpole at a height which is easily accessible in case you want to remove the Enclosure from the flagpole in case of any need.
- Insert the end of the metal hose clamp into the slot available and pull the end of the tile till the enclosure box is tightly fitted.
- Now tighten the tie screw till you are sure that the enclosure box is securely mounted. Use a flat head screwdriver (manual / power).
- Hold the Enclosure and keep the bracket teeth on to the side of the flagpole at a height which is easily accessible in case you want to remove the Enclosure from the flagpole in case of any need.
-
Step 24: Grounding / Earthing:
-
Take the grounding copper wire and connect its one end to the hook available on the Surge Arrestor.
-
Properly ground the other end of the copper wire.
Note: Take help / guidance of some electrical expert on the grounding step.
-
Step 25: Waterproof tape and Insulation tape:
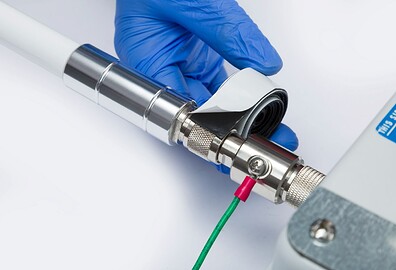
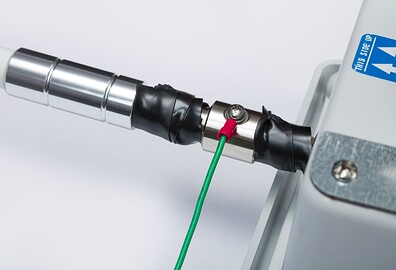
- We must safeguard the antenna to surge arrester connection and surge-arrester to enclosure joints for any water slippage by using the Water-proof tape and Insulation tape.
- First roll the weather-proof tape round the antenna to surge-arrester connection properly.
- Then roll the same round the surge-arrester to the enclosure joint.
-
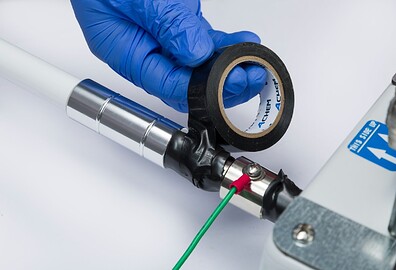
Step 26: Insulation tape:
- Use insulation tape and roll it over the weather-proof tape so as to completely cover it round the antenna to surge-arrester connection properly
- Repeat the same steps on surge-arrester to enclosure joint.
-
Step 27: Now the Outdoor set-up of our Helium Pro Hotspot device is complete. Switch on the power main and make sure the internet is also ON and experience the wider coverage.
Congratulation! Now, you can start monitoring the device on your Helium Application.
![[ClodPi Labs] Discussion and support forum](https://discuss.clodpi.io/uploads/default/original/1X/6046bbcd89d9c9db3896c6cd7b77c593de8d6386.png)
